How To Install CouchDB and Futon on Ubuntu 14.04
Introduction
Apache CouchDB, like Redis, Cassandra, and MongoDB, is a NoSQL database. CouchDB stores data as JSON documents which are non-relational in nature. This allows users of CouchDB to store data in ways that look very similar to their real world counterparts.You can manage CouchDB from the command line or from a web interface called Futon. Futon can be used to perform administrative tasks like creating and manipulating databases, documents, and users for CouchDB.
Goals
By the end of this article, you will:- Have CouchDB installed on a Droplet running Ubuntu 14.04
- Have Futon installed on the same server
- Have secured the CouchDB installation
- Access CouchDB using Futon from your local machine, using a secure tunnel
- Know how to add an admin user to CouchDB
- Perform CRUD operations with CouchDB using Futon
- Perform CRUD operations with CouchDB from the command line
Prerequisites
Please complete the following prerequisites:- Ubuntu 14.04 Droplet
- You are logged in to your server as a non-root user with administrative privileges (Initial Server Setup with Ubuntu 14.04)
root
user as well, in case you don't want to create a sudo user. Please note
that if you do use a non-root user, you'll be asked for your password
the first time you execute a command with sudo.Step 1 — Preparing the Server
Before we can install CouchDB, we need to ensure that the server is set up for it.Begin by updating the system:
- sudo apt-get update
- sudo apt-get install software-properties-common -y
-y flag tells the apt-get command to assume a Yes
response to all the prompts that might come up during the installation
process. You can drop this flag if you prefer responding manually to the
prompts.Add the PPA that will help us fetch the latest CouchDB version from the appropriate repository:
- sudo add-apt-repository ppa:couchdb/stable -y
Now that we have added a new PPA, let's update the system so that it has the latest package information:
- sudo apt-get update
Step 2 — Installing CouchDB
If you previously had CouchDB installed on this server, begin by removing the existing version:
- sudo apt-get remove couchdb couchdb-bin couchdb-common -yf
Now install CouchDB:
- sudo apt-get install couchdb -y
By default, CouchDB runs on localhost and uses the port 5984. You can retrieve this basic information by running
curl from the command line:
- curl localhost:5984
curl installed, you can use the sudo apt-get install curl command to install it.You should get something similar to the following:
Output
{"couchdb":"Welcome","uuid":"b9f278c743b5fc0b971c4e587d77582e","version":"1.6.1","vendor":{"name":"Ubuntu","version":"14.04"}}
curl -X PUT command:
- curl -X PUT localhost:5984/new_database
Output
{"ok":true}
Step 3 — Securing the CouchDB Installation
By default, some of the files and directories created when CouchDB is installed belong to the root user and group. While this is fine (albeit not advisable) during development, it could be a security risk in production.When CouchDB is installed, it creates a user and a group named couchdb. In this section we will change the ownership and permission of the CouchDB files to the couchdb user and group.
Changing the ownership controls what the CouchDB process can access, and changing the permissions controls who can access the CouchDB files and directories.
Before changing the ownership and permissions, stop CouchDB:
- sudo stop couchdb
/usr/lib/couchdb, /usr/share/couchdb, and /etc/couchdb directories, and the /usr/bin/couchdb executable file, such that their owner is couchdb and they belong to the couchdb group.
- sudo chown -R couchdb:couchdb /usr/lib/couchdb /usr/share/couchdb /etc/couchdb /usr/bin/couchdb
/usr/lib/couchdb, /usr/share/couchdb, and /etc/couchdb directories, and the /usr/bin/couchdb executable file, such that the couchdb user and the couchdb group have complete access (to the CouchDB installation) while no other user has access to these files and directories.
- sudo chmod -R 0770 /usr/lib/couchdb /usr/share/couchdb /etc/couchdb /usr/bin/couchdb
- sudo start couchdb
Step 4 — Accessing Futon
CouchDB offers a convenient web-based control panel called Futon. We're going to access it from your local workstation, tunneling the traffic through an SSH connection to your server. This means that only users with an SSH login to your server can access the Futon control panel.To connect securely to CouchDB, without making it publicly available, you can create an SSH tunnel from your local port 5984 to the remote server's port 5984.
You can use the following command, run from your local computer, to set up the tunnel:
- ssh -L5984:127.0.0.1:5984 sammy@your_server_ip
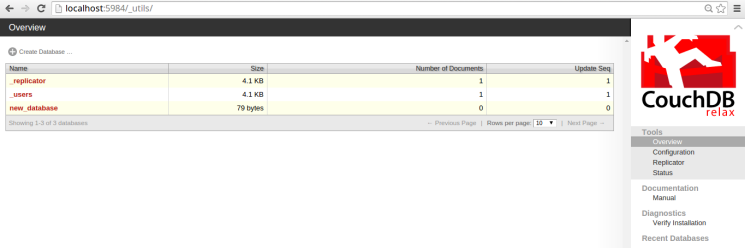
While the connection is open, you can access Futon from your favorite web browser, using port 5984. Visit this URL to display the helpful Futon page:
http://localhost:5984/_utils
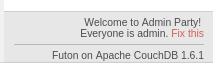
You can change this by clicking on the little Fix this link and creating new administrators.
Step 5 — Adding an Admin User
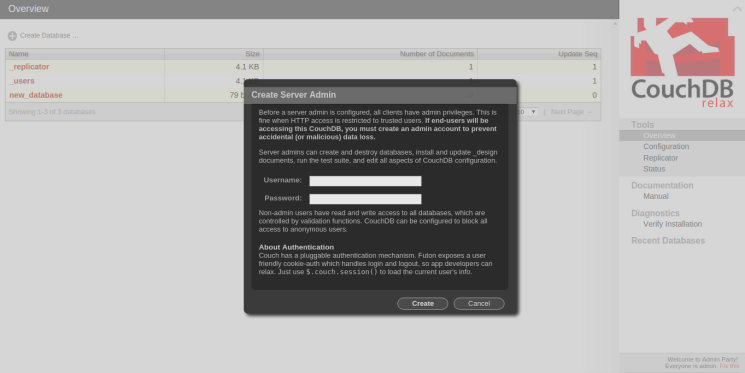
Now that we have CouchDB up and running, let's start using it.Before an admin user is created, all users can access CouchDB with administrative privileges (although they require SSH access to the server first).
It's a good practice to create an admin account for CouchDB, to prevent accidental or unauthorized data loss.
To do this, click the Fix this link that appears in the bottom right corner of Futon. This will bring up a screen that allows you to create a CouchDB admin user, as follows:
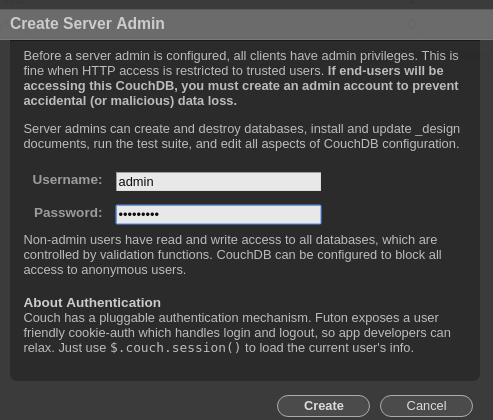
After entering your new CouchDB username and a secure password, click the Create button. This will create the new admin user. The message in the bottom right corner of Futon will confirm this by showing a message similar to the following:
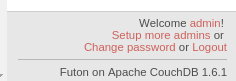
Note: The creation of an admin user prevents unauthorized users from deleting and modifying databases, design documents, and the CouchDB configuration. However, it doesn't prevent them from creating or accessing documents.
Be careful about handing out SSH access to your server. That's it! Our CouchDB server is now fully configured.
To learn more about using the database, keep reading.
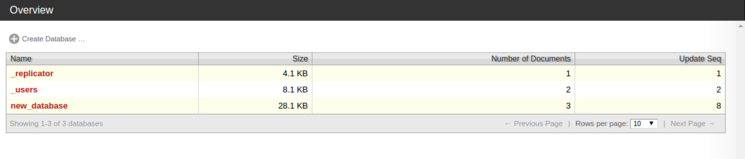
Performing CRUD Operations from Futon
Futon has a very simple but useful user interface which allows you to perform basic CRUD operations (create, read, update, and delete).In this section, we will create a new database named
todos, add a new document to it, and then retrieve, update, and delete this document.Note: If you have created an admin user, you will have to be logged in as the administrator to create a new database.
Make sure you still have your SSH tunnel open. If not, open your connection to the server from your local computer with this command:
- ssh -L5984:127.0.0.1:5984 sammy@your_server_ip
http://localhost:5984/_utils/.Note: This section assumes that CouchDB is being accessed using an SSH tunnel that was set up as described in in the Accessing Futon section above. If your setup is different, make sure you access Futon at the correct URL.
Create a Database and Document
todos, click the Create Database link on the screen. This will bring up a dialog as follows: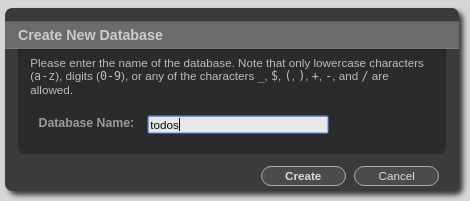
Enter the name of the database and click the Create button.
This will create a new database named
todos and take you to a page where you can start creating and modifying documents in the newly created database.
To create a new document, click the New Document link on the page.
This will open up a screen with a new document. This document will have just the
_id field. You can change the value of this field if you need to or you can leave it as is.
As can be seen above, we have added two fields named
todo and done. By default, new fields have a null value.Double-click the value to change it.
In this example, we have double-clicked the value fields of
todo and done and have entered the values Task 1 and false respectively.Once you have entered the values, either press the
ENTER
key or click the little green check mark next the field to save its
contents. (Failing to do this will leave the value of the field as null.) This should look as follows:
_rev field has been added to it as follows: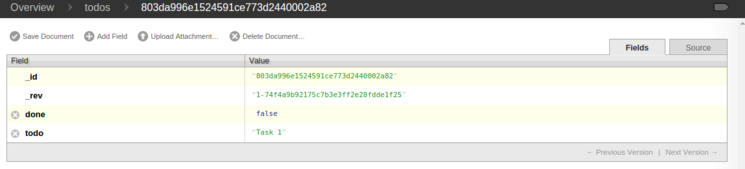
Read a Document
Click on thetodos link (in the top bar next to the Overview link) to view the newly-created document, as the only document in the todos database.
Edit a Document
On this page, you can edit and update the document fields as follows: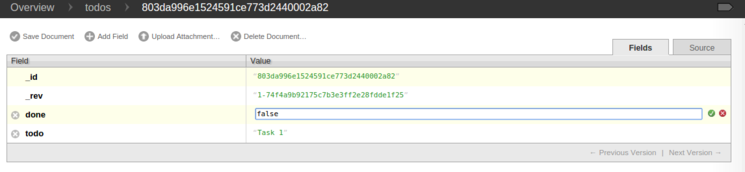
You can delete any field (apart from the
_id and _rev fields), add new fields, or change the values of existing fields. In this example, we have changed the value of the done field from false to true as follows: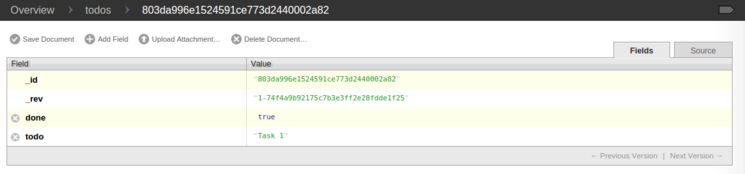
_rev field has been updated as well.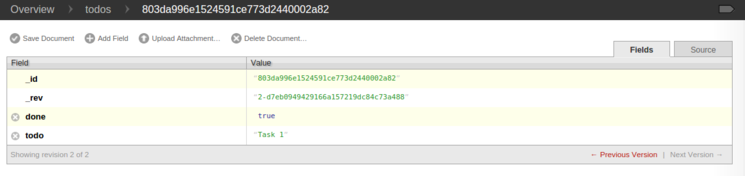
Delete a Document
To delete a document, you can click the Delete Document link which will prompt you for confirmation: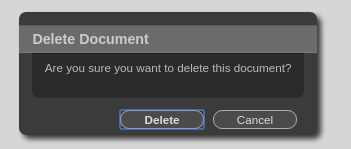
Confirm by pressing the Delete button.
Futon will delete the document and take you to the
todos database page, which should now be empty, confirming that the document has indeed been deleted.Performing CRUD Operations from the Command Line
This section will illustrate how we can perform basic CRUD (create, read, update, and delete) operations on a CouchDB database from the command line usingcurl.Make sure you still have your SSH tunnel open. If not, open your connection to the server from your local computer with this command:
- ssh -L5984:127.0.0.1:5984 sammy@your_server_ip
new_database that was created in Step 2 (Installing CouchDB) above. This section will also assume that we are accessing CouchDB using an SSH tunnel as described in the Accessing Futon
step above. If your setup is different, make sure you replace the URL,
PORT, and the database names appropriately while executing the commands
used below.Create a Database
If you didn't already create the databasenew_database, please do so now. This command should be executed from your local workstation:
- curl -X PUT http://localhost:5984/new_database -u "admin:password"
- {"ok":true}
The results should look like this:
Output
{"ok":true}
Create a Document
Let's begin by creating a new document.
- curl -X POST -d '{"todo":"task 1", "done":false}' http://localhost:5984/new_database -H "Content-Type:application/json"
new_database database.The
-X flag indicates that we are performing an HTTP POST operation. The -H flag followed by the header sets the content type of this request as application/json since we are POSTing a JSON document. Finally, the JSON document itself is included, along with the -d flag.The response of this operation is as follows:
Output
{"ok":true,"id":"803da996e1524591ce773d24400004ff","rev":"1-2fc1d70532433c39c9f61480607e3681"}
"ok":true part of this response indicates that the operation was successful. The response includes the fields id and rev,
which represent the document ID and the document revision respectively.
Both these fields will be required in case this document needs to be
modified or deleted.In this example, the document ID was generated by CouchDB because we didn't supply it with the command. If required, we can create a document with a unique ID that we have generated.
Create with Specified ID
Create a document with the ID
random_task:
- curl -X POST -d '{"_id":"random_task", "todo":"task 2", "done":false}' http://localhost:5984/new_database -H "Content-Type:application/json"
random_task. The response to this command is as follows:
Output
{"ok":true,"id":"random_task","rev":"1-bceeae3c4a9154c87db1649473316e44"}
In addition to creating single documents, we can also create documents in bulk.
- curl -X POST -d '{"docs": [{"todo":"task 3", "done":false}, {"todo":"task 4", "done":false}]}' http://localhost:5984/new_database/_bulk_docs -H "Content-Type:application/json"
- While inserting a single document, the POST body was just a standard
JSON object. In case of bulk inserts, the POST body comprises an object
with a
docsfield. This field holds the array of documents that are to be inserted. - While inserting a single document, the POST request was sent to the URL pointing to the database (
http://localhost:5984/new_database). The request for bulk inserts, however, POSTs to thehttp://localhost:5984/new_database/_bulk_docsURL.
Output
[{"ok":true,"id":"803da996e1524591ce773d24400007df","rev":"1-778fd61f8f460d0c1df1bb174279489d"},{"ok":true,"id":"803da996e1524591ce773d2440001723","rev":"1-dc9e84861bba58e5cfefeed8f5133636"}]
Read a Document
Retrieving a document from a CouchDB database is a simple matter of issuing an HTTP GET command. Let's try to retrieve one of the documents we created above: the one calledrandom_task.
- curl -X GET http://localhost:5984/new_database/random_task
random_task) of the
document which is being retrieved. The response to this GET request, as
shown below, contains the entire document along with the _id and the _rev fields, which can be used to update or delete this document.
Output
{"_id":"random_task","_rev":"1-bceeae3c4a9154c87db1649473316e44","todo":"task 2","done":false}
Edit a Document
While trying to update a document, it is important to include the_rev field. CouchDB will reject any update request which doesn't include a _rev
field. Since CouchDB updates the entire document, and not just parts of
it, the entire document must be sent in the request body during an
update operation.To update the document that was created with the ID
random_task, we need to issue an HTTP PUT request as follows:
- curl -X PUT -d '{"_rev":"1-bceeae3c4a9154c87db1649473316e44", "todo":"task 2", "done":true}' http://localhost:5984/new_database/random_task
_rev value with the string you received in the previous output.This modifies the document and updates the
done field to true. The response to this request is as follows:
Output
{"ok":true,"id":"random_task","rev":"2-4cc3dfb6e76befd665faf124b36b7f1c"}
rev field for this
particular document changes after it has been updated. Any future
request to update or delete this document will now have to use the
newest rev value.Delete a Document
Let's use this newrev value to delete this document using an HTTP DELETE request as follows:
- curl -X DELETE http://localhost:5984/new_database/random_task?rev=2-4cc3dfb6e76befd665faf124b36b7f1c
rev, should have the latest _rev value for the delete operation to be successful.In this particular case, we use the value that was returned after the update operation in the previous step. The response to the above request is shown below.
Output
{"ok":true,"id":"random_task","rev":"3-07d6cde68be2a559497ec263045edc9d"}
Restarting, Stopping, and Starting the CouchDB Service
Starting, stopping and restarting the CouchDB service is quite straightforward. Complete these steps from the server.Restart
To restart a running CouchDB instance, execute the following command:
- sudo restart couchdb
Output
restart: Unknown instance:
Stop
To stop a running CouchDB instance, execute the following command:
- sudo stop couchdb
Output
couchdb stop/waiting
Start
To start CouchDB, execute the following command:
- sudo start couchdb
Output
couchdb start/running, process 12345
Output
start: Job is already running: couchdb
Status
In case you want to check the status of CouchDB, you can do so using the following command:
- sudo status couchdb
Output
couchdb start/running, process 12345
Output
couchdb stop/waiting
Comments
Post a Comment